One of the problems I found with this device was that the Wi-Fi seemed very unreliable where I wanted to position the device. I opened it up and found that the antenna is at the opposite corner of the box from where it needs to connect to inside: so the wire that connects it crosses diagonally the board hugging all the chips.
I thought maybe this was a bad idea; that all then electrical interference from the various circuitry would affect the signal - so the signal strength might look good, but the error rate due to the interference would be high.
(Warning what follows will void your warranty and possibly destroy your device - I take no responsibity)
So I decided to void the warranty. I cut the wire, removed the antenna and drilled a new hole in the right hand side for it to go in. I resoldered a much shorter length of wire back on to the board (be very careful here) and put it back together.
Not perfect but not bad and only took a few minutes. I watched a whole hour of iPlayer and only one minor glitch. Much better than before. Youtube worked fine and sounded good through the optical output.
Decided it could be improved and modified what I saw here.
I stuck the black antenna casing back over the top having removed the sleeving inside it. Seems to be a little better than last time. Device is still only connecting at between 11mbps and 18mbps but the connection seems to be solid.
Saturday, 22 March 2014
Thursday, 20 March 2014
HX8-C Android TV Quad Core Rockchip etc etc.. How to switch it on and other things
I don't watch a lot of telly so when I finally weakened and spent just over £60 on this Android TV box it was much more about mucking about with android than watching anything.
The device is quite attractive and very small, has 4 USB ports (one OTG), HDMI, Optical Audio and an AV socket (which has a red, green and blue phones - which implies to me its component rather than composite and audio. Haven't tried it yet.) A webcam, microphone, external antenna for WiFi, Bluetooth and an infrared remote control.
The is no 'ON' button which poses the first problem; switching it on. Out of the box the device does nothing and even crashed my iiyama monitor. In the end the combination of unplugging and replugging the HDMI and then pressing the tiny reset button with a pen brought it to life (you'll get use to this). Once on, you can put the device to sleep with the 'power' button on the remote. The remote control is next to useless for operating the device and also seems to have the same codes as my DVD player.
I have a Sky Now TV box to compare it with which cost £10. It is a restricted Roku box but you can sideload Youtube which works well. So I have this to compare the HX8-C with. To be honest I haven't been that impressed with the video. The quality of video is not wonderful - in clarity and smoothness its not as good as the Roku. It does on the other hand handle the android side of things well. Wi-Fi is a bit flaky despite the internal antenna and seemed to be dropping to 11mbps despite showing good signal strength.
I decided to see what I could do in terms of rooting, recovery options, custom roms and dual booting.
The HX8-C appears to be the same as the CR11s and the CS968 and there is quite a lot for these devices.
ROOTING OR INSTALLING CUSTOM ROMS MAY RENDER YOU DEVICE USELESS. You perform these operations at your own risk and I take no responsibility for what happens.
Firstly you need to install the Rockchip drivers on your PC and the easiest way is to use the RK_DriverAssistant available with instructions here.
To root the device with windows I used the instructions here. To use the OTG USB port for this purpose you have to set USB DEBUGGING in Developer Options and then under USB check the 'Connect to PC'. As you run the TPSparkyRoot.Bat, each time your HX8-C reboots you will have to recheck the USB/Connect to PC checkbox.
Root is not necessarily permenant. That is because the devices recovery system rewrites it if anything goes wrong. I tried to instal ClockWorkMod - it failed and root was lost as the device repaired itself.
I installed a Reboot app as the device only has the option to Power off and removing the HDMI and pressing the reset button to get it back on again becomes tiring. I then downloaded Nandroid Backup and backed up in both CWM and TWRP, copied them to my PC, in case of problems later.
Opening the device up - top view
Underneath view
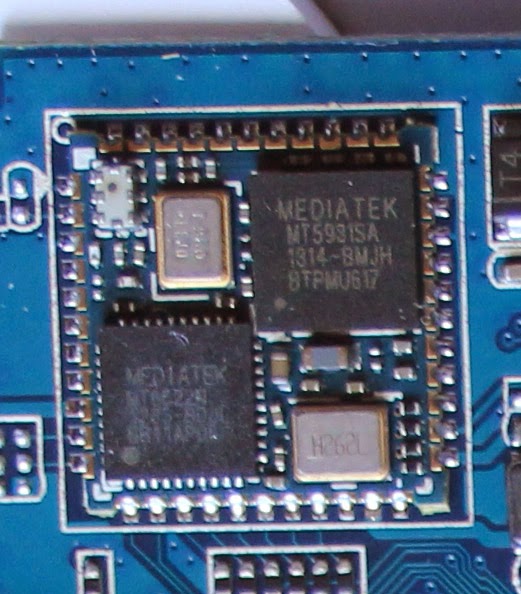
The wifi chipset is Mediatek MT5931 / MT6622 bluetooth
This indicates that the box is similar to the CS968 v3 but the board number is HTC-T018-V4 so it is obviously the latest version. Unfortunately most of the custom roms and the Linuxium dual boot are for the CS968 v2 which uses the AP6210 wifi chip. Use those roms here and you will have no wifi/bluetooth.
That's all for now.. write some more later.
The device is quite attractive and very small, has 4 USB ports (one OTG), HDMI, Optical Audio and an AV socket (which has a red, green and blue phones - which implies to me its component rather than composite and audio. Haven't tried it yet.) A webcam, microphone, external antenna for WiFi, Bluetooth and an infrared remote control.
The is no 'ON' button which poses the first problem; switching it on. Out of the box the device does nothing and even crashed my iiyama monitor. In the end the combination of unplugging and replugging the HDMI and then pressing the tiny reset button with a pen brought it to life (you'll get use to this). Once on, you can put the device to sleep with the 'power' button on the remote. The remote control is next to useless for operating the device and also seems to have the same codes as my DVD player.
I have a Sky Now TV box to compare it with which cost £10. It is a restricted Roku box but you can sideload Youtube which works well. So I have this to compare the HX8-C with. To be honest I haven't been that impressed with the video. The quality of video is not wonderful - in clarity and smoothness its not as good as the Roku. It does on the other hand handle the android side of things well. Wi-Fi is a bit flaky despite the internal antenna and seemed to be dropping to 11mbps despite showing good signal strength.
I decided to see what I could do in terms of rooting, recovery options, custom roms and dual booting.
The HX8-C appears to be the same as the CR11s and the CS968 and there is quite a lot for these devices.
ROOTING OR INSTALLING CUSTOM ROMS MAY RENDER YOU DEVICE USELESS. You perform these operations at your own risk and I take no responsibility for what happens.
Firstly you need to install the Rockchip drivers on your PC and the easiest way is to use the RK_DriverAssistant available with instructions here.
To root the device with windows I used the instructions here. To use the OTG USB port for this purpose you have to set USB DEBUGGING in Developer Options and then under USB check the 'Connect to PC'. As you run the TPSparkyRoot.Bat, each time your HX8-C reboots you will have to recheck the USB/Connect to PC checkbox.
Root is not necessarily permenant. That is because the devices recovery system rewrites it if anything goes wrong. I tried to instal ClockWorkMod - it failed and root was lost as the device repaired itself.
I installed a Reboot app as the device only has the option to Power off and removing the HDMI and pressing the reset button to get it back on again becomes tiring. I then downloaded Nandroid Backup and backed up in both CWM and TWRP, copied them to my PC, in case of problems later.
Opening the device up - top view
Underneath view
The wifi chipset is Mediatek MT5931 / MT6622 bluetooth
This indicates that the box is similar to the CS968 v3 but the board number is HTC-T018-V4 so it is obviously the latest version. Unfortunately most of the custom roms and the Linuxium dual boot are for the CS968 v2 which uses the AP6210 wifi chip. Use those roms here and you will have no wifi/bluetooth.
That's all for now.. write some more later.
Friday, 1 November 2013
How to get rid of the Get Started help stickers in Windows 8.1
The upgrade to 8.1 has been very disappointing. Quite how they managed to pack so little into the 3.5GB download I don't know; I'm sure all of the changes could have been accomplished with a small patch.
Never the less having done it, and using the fabulous Classic Shell V4.x no harm has been done... except...
Although I steer clear of theMetro interface I do use the Calendar and Contacts apps occasionally for convenience - even though they are not very good. Sadly since the upgrade they have been blighted with helpful 'stickers' which won't go away until you have proved you have understood them by doing what they say and even more sadly, its impossible to do some of the things without a touch screen. The result is valuable screen space is hogged by these annoying messages and there is not much you can do about it.
I managed to find a cure on a helpful web page and it involves using the registry editor so - WARNING- YOU COULD DAMAGE YOUR COMPUTER - if you are not happy doing that best buy a touch screen.
Launch your favourite registry editor.
go to HKEY_CURRENT_USER\Software\Policies\Microsoft\Windows
in the edit menu do 'New Key' and name it 'EdgeUI'
go into this new key you have created and in the edit menu do 'New 32bit D-word'
name it DisableHelpSticker and give it a value of 1
reboot and there your go.
If you feel unhappy with any of the above don't go ahead. you can break your computer with the registry editor.
Never the less having done it, and using the fabulous Classic Shell V4.x no harm has been done... except...
Although I steer clear of the
I managed to find a cure on a helpful web page and it involves using the registry editor so - WARNING- YOU COULD DAMAGE YOUR COMPUTER - if you are not happy doing that best buy a touch screen.
Launch your favourite registry editor.
go to HKEY_CURRENT_USER\Software\Policies\Microsoft\Windows
in the edit menu do 'New Key' and name it 'EdgeUI'
go into this new key you have created and in the edit menu do 'New 32bit D-word'
name it DisableHelpSticker and give it a value of 1
reboot and there your go.
If you feel unhappy with any of the above don't go ahead. you can break your computer with the registry editor.
Monday, 21 October 2013
Windows 8.1 update fails 0xC1900101 0x40017
Apparently its the second number that gives the detail - 0xC1900101 means it didn't work and 0x40017 is why - if you have the secret code book.
There is a lot of documentation suggesting Nvidia drivers should be up to date as only the most recent support 8.1.
But that didn't work for me - after two failed attempts I removed my gaming mouse SteelSeries software (forget which website suggested it) and all was well and it updated in about an hour.
One final tip. If you have a failed attempt it does not download the whole 3.5Gb again. If you go to the app store and click download 8.1 it skips the download part and then gets on with it.
Its very difficult to imagine whats in the 3.5Gb of download: 'My Computer' is now called 'This PC' and SkyDrive is slightly more integrated than before. Apparently the metro interface is better but I could not see any difference. And with Classic Shell v4.1 you can now turn off seeing 'apps' in the Start Menu so you can almost completely forget your using windows 8 :)
There is a lot of documentation suggesting Nvidia drivers should be up to date as only the most recent support 8.1.
But that didn't work for me - after two failed attempts I removed my gaming mouse SteelSeries software (forget which website suggested it) and all was well and it updated in about an hour.
One final tip. If you have a failed attempt it does not download the whole 3.5Gb again. If you go to the app store and click download 8.1 it skips the download part and then gets on with it.
Its very difficult to imagine whats in the 3.5Gb of download: 'My Computer' is now called 'This PC' and SkyDrive is slightly more integrated than before. Apparently the metro interface is better but I could not see any difference. And with Classic Shell v4.1 you can now turn off seeing 'apps' in the Start Menu so you can almost completely forget your using windows 8 :)
Friday, 23 August 2013
WM8850 chinese tablet - bigger batteries and broken screens
The one I bought has a VIA8850 Cortex-A9;1.7GHz processor, 512MB Ram and 4Gb storage. Searching around I found it was a Benton BT-M708D (Benton was still in the wi-fi list!).
It comes with Android 4.1.1 and a kind of Windows Metro interface which actually isn't that bad.
I had done some research into ROMS for it and there seems to be one, Uberoid available at www.Techknow.me. This is a ROM for a lot of chinese tablets. Using its tools I determined that mine was a Eken_MID7_W70_GSL1680_Z7Z67-030A and I also determine that the wi-fi did not seem to work so I decided not to bother.
I bought it for a friend's kid and bought it well ahead of his birthday to make sure it was OK (I had had bad experience with other cheap Chinese tablets).
Its not bad at all and far better than than the A13 tablets which I had tried before. One problem is there are no accessories made for it that I can find ( don't believe the dimensions advertised anywhere - it is about the same length and depth as a Galaxy Tab to but not as wide, and I modified a case out of one for this tablet.)
The kid loved it but the battery life was very poor, he ended up using it plugged into the charger and then the charger connector (2.5mm) bent and so I bought a new one with a longer lead. Also the screen scuff really quickly and I found that screen protectors for the old Kindle Fire worked very well. Also, he tended to use it without the case and then one fateful day, it was in his bag, the bag hit a wall and when we took it out the screen was smashed.
So I thought I would try and fix and enhance it before shelling out another £50 for a new one.
I MADE THESE MODIFICATIONS AND REPAIRS AT MY OWN RISK AND TAKE NO RESPONSIBILITY FOR ANY PROBLEMS YOU HAVE IF YOU TRY IT YOURSELF. YOUR TABLET MAY BE DIFFERENT SO DO YOUR OWN RESEARCH.
There is no Rom manager or recovery avaliable for these tablets and I could not find a download of the factory Rom which I knew was correct. There seemed to be a lot of people with bricked tablets out there from tampering.
The Samsung battery is only 2.8mm thick but there seemed to be a bit of extra space in the case so I searched eBay for a bigger one that would fit. I bought what was described as 3.7V 3500mAh 4358107 lithium Battery Rechargeable Polymer Li-Po For Tablet PC from the seller bestuonline . Its dimensions are 107mm(L) * 58mm(W) * 4.3mm(H). It came fairly quickly and it was an easy job to unsolder the old one and put in the new one. * See end - battery did not stay good for long... :(
The difference was unbelievable. After half an hour of youtube and angrybirds which would have reduced the old battery to about 30% the new one dropped steadily to 80%.
Very pleased but not actually tried closing the case with the new battery yet.. I'm still waiting for the screen,
It is actually the Digitizer that has gone, not the LCD and I managed to find what I hope is the right one from DHGate.com . It was just over £12 with postage and is still somewhere on its way to me. Item - Cheap Front Touch Screen Glass Digitizer Replacement for WM8850 - item # 160990373
http://www.dhgate.com/product/cheap-front-touch-screen-glass-digitizer/160990373.html#s1-1-1|3597684784
IT MAY NOT BE THE RIGHT MODEL FOR YOU SO DO YOUR RESEARCH - DO NOT BLAME ME IF ITS WRONG
From what I have seen, you have to be VERY careful with digitizers, they tend to be the thing that doesn't work propery on cheap tablets and if you scuff the delicate side, you've ruined it.
Here is the inside view of the removed digitiser for those that are interested. There is what looks like a part number / date Y7Y001/20121229.
Now waiting for the new digitizer to arrive.
The new Digitizer has arrived! Just under two weeks from china, looks like its the correct model, will let you know.
I used this video on Youtube to guide me. It is for a different tablet but the principles are the same.
http://www.youtube.com/watch?v=RUe-YqUZr_E
The touchscreen had to be removed from the bezil and the new touchscreen stuck in - it all took about 15 minutes.
Put it all back together and it works!
And whats more the new super battery fits as well.
A successful venture that saved £40 and improved the battery life from miserable to reasonable!
UPDATE!!! A month later and the new battery caused loads of problems. Seemed fine at first then suddenly would looks all charge when you weren't looking. Have put the old battery back in.
Monday, 6 May 2013
Software update fails on Galaxy S2 - it could be the battery
I thought I would write about this as I had to go through loads of forums where where people asked a question ' why does my battery drain terribly when I enter recovery' and the answer was 'search the forum, its already been answered, stop wasting our time.'
If you happened to phrase your search exactly right then you might find it, and I eventually did. So here it is:
Your battery may appear to be working fine, but, if you've been using it for over a year, and remembering lithium ion batteries only last for 500 charges, it may not operate correctly in the high current environment of software update or recovery.
Samsung and Rom makers say you should always have a fully charged battery before updating the software and most custom Rom makers say you should have at least 66%. But I was seeing the battery charge drop to 8% after updating and someone I know had the update get corrupted (presumably the battery completely failed for a while) and his phone is still not working.
So the answer is easy - get a new battery. And if your phone is boot looping after a failed update you can try the instructions here to blow the operating system back - (again no warranties whatsoever - use at your own risk)
http://reviews.cnet.co.uk/mobile-apps/how-to-go-back-to-a-stock-android-rom-on-samsung-galaxy-s2-50007880/
If you happened to phrase your search exactly right then you might find it, and I eventually did. So here it is:
Your battery may appear to be working fine, but, if you've been using it for over a year, and remembering lithium ion batteries only last for 500 charges, it may not operate correctly in the high current environment of software update or recovery.
Samsung and Rom makers say you should always have a fully charged battery before updating the software and most custom Rom makers say you should have at least 66%. But I was seeing the battery charge drop to 8% after updating and someone I know had the update get corrupted (presumably the battery completely failed for a while) and his phone is still not working.
So the answer is easy - get a new battery. And if your phone is boot looping after a failed update you can try the instructions here to blow the operating system back - (again no warranties whatsoever - use at your own risk)
http://reviews.cnet.co.uk/mobile-apps/how-to-go-back-to-a-stock-android-rom-on-samsung-galaxy-s2-50007880/
Sunday, 17 February 2013
Installing the Amazon Mobile plugin for Eclipse for people who refuse to read the instructions
Well if you are like me and you've wasted a day trying to install the Amazon Mobile App SDK Eclipse Plugin I would like to point out something that I didn't do.
There is a page dedicated to the SDK but there is another page dedicated to lucky eclipse users saying how easy it is for them because there is a dedicated eclipse plugin here.
THE SDK IS NOT INCLUDED IN THE PLUGIN!
So maybe this is suppose to be apparent to programmy people. The only reference I could find to it was in the requirements:
So for the lazy:
1.) Download the SDK and copy it to a location you are happy to call its install location.
2.) Follow these instructions for installing the plugin.
3.) Then in:
There is a page dedicated to the SDK but there is another page dedicated to lucky eclipse users saying how easy it is for them because there is a dedicated eclipse plugin here.
THE SDK IS NOT INCLUDED IN THE PLUGIN!
So maybe this is suppose to be apparent to programmy people. The only reference I could find to it was in the requirements:
When you read this (which of course you wouldn't do because you never read the requirements) all makes sense.
- The latest version of the Amazon Mobile App SDK. Versions of the SDK that work with the Eclipse plugin include a
spec.yamlfile in thetoolsfolder of each of the APIs.
Make note of your SDK path, because you must provide it when installing the Eclipse plugin.
So for the lazy:
1.) Download the SDK and copy it to a location you are happy to call its install location.
2.) Follow these instructions for installing the plugin.
3.) Then in:
In Eclipse, on the Window menu (on a Mac, on the Eclipse menu), click Preferences, and then click Amazon Mobile App SDK.Reading this back it seems obvious but I did waste a day not realizing that the SDK wasn't included in the plugin so so might you.
In the SDK Location box, specify the path where you installed the Amazon Mobile App SDK, and then click OK.
Subscribe to:
Posts (Atom)