
The device is quite attractive and very small, has 4 USB ports (one OTG), HDMI, Optical Audio and an AV socket (which has a red, green and blue phones - which implies to me its component rather than composite and audio. Haven't tried it yet.) A webcam, microphone, external antenna for WiFi, Bluetooth and an infrared remote control.
The is no 'ON' button which poses the first problem; switching it on. Out of the box the device does nothing and even crashed my iiyama monitor. In the end the combination of unplugging and replugging the HDMI and then pressing the tiny reset button with a pen brought it to life (you'll get use to this). Once on, you can put the device to sleep with the 'power' button on the remote. The remote control is next to useless for operating the device and also seems to have the same codes as my DVD player.
I have a Sky Now TV box to compare it with which cost £10. It is a restricted Roku box but you can sideload Youtube which works well. So I have this to compare the HX8-C with. To be honest I haven't been that impressed with the video. The quality of video is not wonderful - in clarity and smoothness its not as good as the Roku. It does on the other hand handle the android side of things well. Wi-Fi is a bit flaky despite the internal antenna and seemed to be dropping to 11mbps despite showing good signal strength.
I decided to see what I could do in terms of rooting, recovery options, custom roms and dual booting.
The HX8-C appears to be the same as the CR11s and the CS968 and there is quite a lot for these devices.
ROOTING OR INSTALLING CUSTOM ROMS MAY RENDER YOU DEVICE USELESS. You perform these operations at your own risk and I take no responsibility for what happens.
Firstly you need to install the Rockchip drivers on your PC and the easiest way is to use the RK_DriverAssistant available with instructions here.
To root the device with windows I used the instructions here. To use the OTG USB port for this purpose you have to set USB DEBUGGING in Developer Options and then under USB check the 'Connect to PC'. As you run the TPSparkyRoot.Bat, each time your HX8-C reboots you will have to recheck the USB/Connect to PC checkbox.
Root is not necessarily permenant. That is because the devices recovery system rewrites it if anything goes wrong. I tried to instal ClockWorkMod - it failed and root was lost as the device repaired itself.
I installed a Reboot app as the device only has the option to Power off and removing the HDMI and pressing the reset button to get it back on again becomes tiring. I then downloaded Nandroid Backup and backed up in both CWM and TWRP, copied them to my PC, in case of problems later.
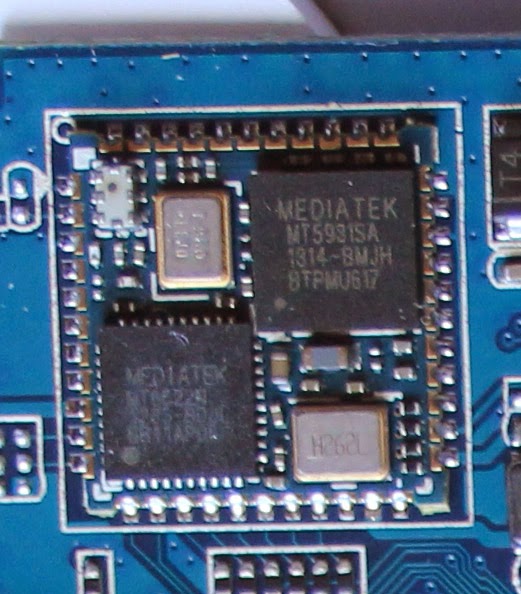
Opening the device up - top view


That's all for now.. write some more later.
Hi! Which cable and driver did you use for USB debugging?
ReplyDeleteMiniTool Mac Data Recovery Boot Disk is a boot disk version of MiniTool Mac Data Recovery.You can tell your friends who meet the problem of losing data. This software must help you scsi interface.
ReplyDelete